Mybatis 源码分析-----SessionFactory和XML解析
完成状态
- 开发中
- 未完成
- 已完成
- 维护中
前言
上一节针对mybatis构建了测试项目,基于上一节的内容上,在本节中针对 SessionFactory 进行深入的分析, 在进行具体的源码分析之前,首先先了解下mybatis中的几个概念
mybatis 架构
注意: 本部分只是针对一些概念进行简介, 详细的架构图(流程图)会在源码分析完毕后进行给出
- SessionFactory
通过此类来生产处 Session 对象,用于数据库操作 - Session
作为mybatis顶层的API 接口,完成针对数据库的增删改查操作 - Executor
执行器,是mybatis的核心组件,负责SQL动态语句的生成以及缓存的操作和维护 - StatementHandler
负责与JDBC 的交互
SessionFactory
首先先来回顾下 上一节中 测试代码部分,看看是如何生获得一个 Factory 的
// 加载配置
String resource = "mybatis.xml";
// 1、 读取配置
InputStream inputStream = Resources.getResourceAsStream( resource );

// 2、 生成 SessionFactory
SqlSessionFactory sqlSessionFactory = new SqlSessionFactoryBuilder().build(inputStream);
通过以上代码可以知道,如果 SqlSessionFactory 是通过两步获得: 1. 解析配置文件; 2. SqlSessionFactoryBuilder构造
解析 xml 配置文件
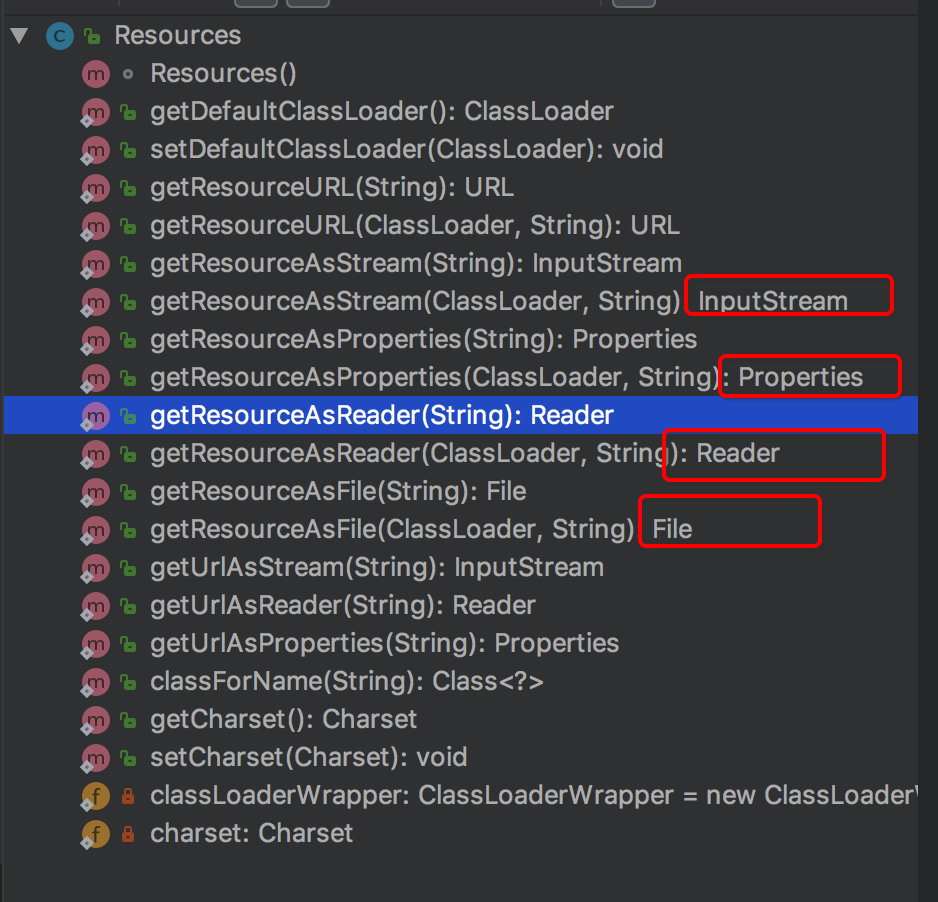
mybatis框架中,针对xml 格式的配置资源文件,专门提供了辅助类Resources,并且此类还提供了多种文件处理方式,可以将XML文件转换为InputStream,Reader,File,Properties等多种格式。 并且此类针对不同的表示方式也提供了不同的实现方式(路径,名称等)

以上是 Resources 类提供的方法
SessionFactory
通过对源码进行查看可以了解SessionFactory是一个接口类,并不能直接进行实例化,如果想获得一个 SessionFactory 实体类对象,需要通过SqlSessionFactoryBuilder来获得。顾名思义,此类就是一个 SessionFactory 实现类对象的构建类
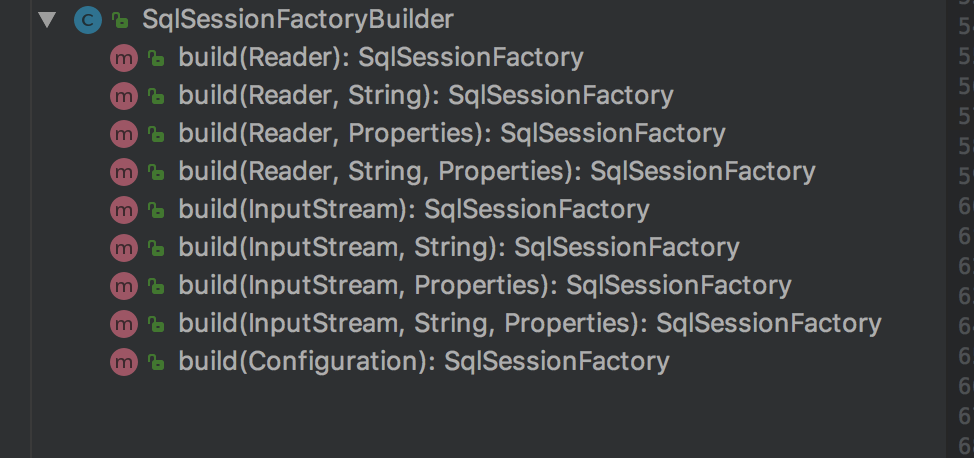
SqlSessionFactoryBuilder 类方法
通过查看其方法提供可以看出,其只有一个 build方法的不同重载。通过此方法将 步骤一获取的 xml 的不同形式转化为一个对象(通过配置文件创建SqlSessionFactory对象的). 此类主要提供了两种输入流形式(字节流和字符流)
  // 解析 xml  字符流
  public SqlSessionFactory build(Reader reader, String environment, Properties properties) {
    try {
      XMLConfigBuilder parser = new XMLConfigBuilder(reader, environment, properties);
      return build(parser.parse());
    } catch (Exception e) {
      throw ExceptionFactory.wrapException("Error building SqlSession.", e);
    } finally {
      ErrorContext.instance().reset();
      try {
        reader.close();
      } catch (IOException e) {
        // Intentionally ignore. Prefer previous error.
      }
    }
  }

// 解析xml  InputStream 字节流
 public SqlSessionFactory build(InputStream inputStream, String environment, Properties properties) {
    try {
      // 解析配置文件
      XMLConfigBuilder parser = new XMLConfigBuilder(inputStream, environment, properties);
      return build(parser.parse());
    } catch (Exception e) {
      throw ExceptionFactory.wrapException("Error building SqlSession.", e);
    } finally {
      ErrorContext.instance().reset();
      try {
        inputStream.close();
      } catch (IOException e) {
        // Intentionally ignore. Prefer previous error.
      }
    }
  }
通过以上代码可以看出,其中主要进行了两步,接下来将针对其内部进行解析说明:
1. 解析XML
    XMLConfigBuilder parser = new XMLConfigBuilder(inputStream, environment, properties);
    XMLConfigBuilder parser = new XMLConfigBuilder(reader, environment, properties);
阅读源码就是一个假设和验证的过程, 此处从名字可以猜测出 XMLConfigBuilder 类是一个XML相关的类。并查看得知此类继承自BaseBuilder抽象类
    private XMLConfigBuilder(XPathParser parser, String environment, Properties props) {
        // 初始化一个configuration对象
        super(new Configuration());
        ErrorContext.instance().resource("SQL Mapper Configuration");
        this.configuration.setVariables(props);
        this.parsed = false;
        this.environment = environment;
        this.parser = parser;
    }
构造函数进行了属性的初始化。其只是进行了构造初始化属性的操作,并没有进行解析操作,解析操作存在于 parse方法中
 // 解析XML
  public Configuration parse() {
    // 通过此种方式,保证解析过程只调用一次
    if (parsed) {
      throw new BuilderException("Each XMLConfigBuilder can only be used once.");
    }
    parsed = true;
    // 开始解析子节点
    parseConfiguration(parser.evalNode("/configuration"));
    return configuration;
  }
以上的解析操作,其中parseConfiguration 方法中是针对不同的子节点进行解析操作,此处才是具体的解析过程。并且其在解析前通过操作一个parsed属性,来确保解析操作不会被进行多次
// 解析各个子节点
  private void parseConfiguration(XNode root) {
    try {
      //issue #117 read properties first
      // 解析<properties>节点
      propertiesElement(root.evalNode("properties"));
      //解析<settings>节点
      Properties settings = settingsAsProperties(root.evalNode("settings"));
      loadCustomVfs(settings);
      // 解析<typeAliases>节点
      typeAliasesElement(root.evalNode("typeAliases"));
      // 解析<plugins>节点
      pluginElement(root.evalNode("plugins"));
      // 解析<objectFactory>节点
      objectFactoryElement(root.evalNode("objectFactory"));
      objectWrapperFactoryElement(root.evalNode("objectWrapperFactory"));
      // 解析<reflectorFactory>节点
      reflectorFactoryElement(root.evalNode("reflectorFactory"));
      settingsElement(settings);
      // 解析<environments>节点
      // read it after objectFactory and objectWrapperFactory issue #631
      environmentsElement(root.evalNode("environments"));
      databaseIdProviderElement(root.evalNode("databaseIdProvider"));
      typeHandlerElement(root.evalNode("typeHandlers"));
      // 解析<mappers>节点
      mapperElement(root.evalNode("mappers"));
    } catch (Exception e) {
      throw new BuilderException("Error parsing SQL Mapper Configuration. Cause: " + e, e);
    }
  }
通过以上内容,可以反推出 mybatis.xml配置文件中可配置的属性
通过以上方式,针对配置文件XML进行解析,并将解析结果以Configuration对象形式存储,BaseBuilder 类保存一个全局的对象 (此处还是有点复杂的,虽然说只是解析XML). 针对以上解析操作中部分进行说明
关键点: BaseBuilder抽象类中的configuration是全局对象,现在还无法看出,后续会进行证明
解析
<properties>节点
在具体的源码解析之前,先看下XML文件中针对此处都可进行哪些配置xml 配置解析 此部分内容是是可动态替换的,可以通过Java配置也可以通过properties 元素的子元素来传递
  <properties resource="org/mybatis/example/config.properties">
      <property name="username" value="dev_user"/>
      <property name="password" value="F2Fa3!33TYyg"/>
      <property name="url" value="${url}"/>
  </properties>
以上内容来自 mybatis官网
源码分析
此处给出的就是源码中关于解析以上节点信息的代码private void propertiesElement(XNode context) throws Exception { if (context != null) { // 获取所有子节点 Properties defaults = context.getChildrenAsProperties(); // 获取resouce属性内容 String resource = context.getStringAttribute("resource"); // 获取<properties>节点上的url属性 String url = context.getStringAttribute("url"); // resource和url不能同时存在 if (resource != null && url != null) { throw new BuilderException("The properties element cannot specify both a URL and a resource based property file reference. Please specify one or the other."); } //获取resource属性值对应的properties文件中的键值对,并添加至defaults容器中 if (resource != null) { defaults.putAll(Resources.getResourceAsProperties(resource)); } else if (url != null) { defaults.putAll(Resources.getUrlAsProperties(url)); } //获取configuration中原本的属性,并添加至defaults容器中,(合并属性) Properties vars = configuration.getVariables(); if (vars != null) { defaults.putAll(vars); } parser.setVariables(defaults); // 将defaults容器添加至configuration中 configuration.setVariables(defaults); } }以上是解析
<properties>节点的方式,首先先将其节点中的内容解析为Properties形式,然后将configuration现存的Properties获取出来与当前解析出的进行合并,然后操作configuration属性,将合并后结果又填充到此对象中
解析
<setting>节点- xml 配置解析
<settings> <setting name="cacheEnabled" value="true"/> <!--<setting name="heelo" value="true"/>--> </settings>setting的 name 以及 value 属性的值都是可随机的 源码分析
  private Properties settingsAsProperties(XNode context) {
      if (context == null) {
      return new Properties();
      }
      // 获取所有子节点属性
      Properties props = context.getChildrenAsProperties();
      // Check that all settings are known to the configuration class
      // 获取默认支持的的配置
      MetaClass metaConfig = MetaClass.forClass(Configuration.class, localReflectorFactory);
      // 遍历配置,由于setting中的name是可以随机设置的,所以要踢出不符合要求的(给出用户提示)
      for (Object key : props.keySet()) {
      if (!metaConfig.hasSetter(String.valueOf(key))) {
          throw new BuilderException("The setting " + key + " is not known.  Make sure you spelled it correctly (case sensitive).");
      }
      }
      return props;
  }
从以上可以看出,mybaits只是约定了节点为
settings/setting,但是并没有约定具体的节点name属性和value属性应该的值。不过,并不能是任意值,系统需要使用的属性以及属性对应的值都有给定的范围,(通过限定系统以限定用户输入)。用户输入是无状态的,所以此处需要踢出掉用户输入不合法的节点,通过for-in 循环遍历的方式来给出用户提示,当用户输入和不合法的内容时,系统抛出异常mybatis 给出了 settings 可设置的属性以及对应的值信息
- xml 配置解析
解析
<typeAliases>节点
mybatis 通过指定别名的方式来减少类完全限定名的冗余问题private void typeAliasesElement(XNode parent) { if (parent != null) { // 遍历子节点 for (XNode child : parent.getChildren()) { // 子节点名称为 package if ("package".equals(child.getName())) { String typeAliasPackage = child.getStringAttribute("name"); // 包下所有类起别名 configuration.getTypeAliasRegistry().registerAliases(typeAliasPackage); } else { // String alias = child.getStringAttribute("alias"); String type = child.getStringAttribute("type"); try { Class<?> clazz = Resources.classForName(type); // 添加别名 if (alias == null) { typeAliasRegistry.registerAlias(clazz); } else { typeAliasRegistry.registerAlias(alias, clazz); } } catch (ClassNotFoundException e) { throw new BuilderException("Error registering typeAlias for '" + alias + "'. Cause: " + e, e); } } } } }根据mybatisxml配置文件的约束中关于
<typeAliases>节点的实现上,mybatis给定了多种实现方式<typeAliases> <typeAlias alias="User" type="test.entity.User"/> <typeAlias alias="Blog" type="test.entity.User"/> </typeAliases> <typeAliases> <package name="test.entity"/> </typeAliases>其在解析上也需要针对以上两种情况做不同的处理,
- 当以包的形式来进行设置别名
public void registerAliases(String packageName, Class<?> superType){ ResolverUtil<Class<?>> resolverUtil = new ResolverUtil<Class<?>>(); resolverUtil.find(new ResolverUtil.IsA(superType), packageName); // 获取包下的所有类 Set<Class<? extends Class<?>>> typeSet = resolverUtil.getClasses(); // 遍历 for(Class<?> type : typeSet){ // Ignore inner classes and interfaces (including package-info.java) // Skip also inner classes. See issue #6 if (!type.isAnonymousClass() && !type.isInterface() && !type.isMemberClass()) { registerAlias(type); } } } public void registerAlias(String alias, Class<?> value) { if (alias == null) { throw new TypeException("The parameter alias cannot be null"); } // issue #748 String key = alias.toLowerCase(Locale.ENGLISH); if (TYPE_ALIASES.containsKey(key) && TYPE_ALIASES.get(key) != null && !TYPE_ALIASES.get(key).equals(value)) { throw new TypeException("The alias '" + alias + "' is already mapped to the value '" + TYPE_ALIASES.get(key).getName() + "'."); } TYPE_ALIASES.put(key, value); } // TYPE_ALIASES private final Map<String, Class<?>> TYPE_ALIASES = new HashMap<String, Class<?>>(); // 默认也提供了很多基础类型以及常见数据类型的别名实现 - 以
typeAlias指定类来设置别名alias= “User”论设置是大写还是小写,系统会默认全部转为小写alias = ""由于其底层是一个HashMap结构,虽然允许key为"",但是在设置多个时,只会存在一个alias = null系统会取类名,并且类名转小写
- 当以包的形式来进行设置别名
解析
<pligins>节点
mybatis 插件机制是一个提供另一种方式对已映射语句执行过程中的某一点进行拦截调用。默认情况下支持对一下方法提供插件调用:Executor(执行器),ParameterHandler(拦截参数处理),ResultSetHandler(拦截结果处理),StatementHandler(拦截SQL构建处理)
mybatis 的插件实现非常简单,只需要实现Interceptor接口,并指定想要拦截的方法签名// ExamplePlugin.java @Intercepts({@Signature( // 拦截类型 type= Executor.class, // 方法 method = "update", // 参数 args = {MappedStatement.class,Object.class})}) public class ExamplePlugin implements Interceptor { public Object intercept(Invocation invocation) throws Throwable { return invocation.proceed(); } public Object plugin(Object target) { return Plugin.wrap(target, this); } public void setProperties(Properties properties) { } }以上是mybatis官网给出的示例
- XML配置示例
<plugins> <plugin interceptor="org.mybatis.example.ExamplePlugin"> <property name="someProperty" value="100"/> </plugin> </plugins> - 源码解析
  /**
  * 解析插件
  * @param parent
  * @throws Exception
  */
  private void pluginElement(XNode parent) throws Exception {
      if (parent != null) {
      // 遍历所有的子节点
      for (XNode child : parent.getChildren()) {
          // 获取属性值
          String interceptor = child.getStringAttribute("interceptor");
          // 获取所有的property 值
          Properties properties = child.getChildrenAsProperties();
          // 创建类对象并设置参数
          Interceptor interceptorInstance = (Interceptor) resolveClass(interceptor).newInstance();
          interceptorInstance.setProperties(properties);
          // 缓存起来
          configuration.addInterceptor(interceptorInstance);
      }
      }
  }
    public <T> Class<T> resolveAlias(String string) {
      try {
      if (string == null) {
          return null;
      }
      // issue #748
      String key = string.toLowerCase(Locale.ENGLISH);
      Class<T> value;
      // 包含 key 将类名转为小写
      if (TYPE_ALIASES.containsKey(key)) {
          value = (Class<T>) TYPE_ALIASES.get(key);
      } else {
          value = (Class<T>) Resources.classForName(string);
      }
      return value;
      } catch (ClassNotFoundException e) {
      throw new TypeException("Could not resolve type alias '" + string + "'.  Cause: " + e, e);
      }
  }
- XML配置示例
解析
<objectFactory> 和 <objectWrapperFacotry>节点解析
<reflectorFactory>节点解析
<environments>,<databaseIdProvider>,<typeHandlers>节点- xml 配置示例以及讲解
<environments default="development"> <environment id="development"> <transactionManager type="JDBC"> <property name="..." value="..."/> </transactionManager> <dataSource type="POOLED"> <property name="driver" value="${driver}"/> <property name="url" value="${url}"/> <property name="username" value="${username}"/> <property name="password" value="${password}"/> </dataSource> </environment> </environments> - java 源码分析
<environments>源码分析
根据官方文档说明 mybatis 支持配置多个不同的数据库环境,所以此处需要针对此种情况做处理。但是,注意看源码部分,其中有一个private void environmentsElement(XNode context) throws Exception { // 遍历 if (context != null) { // 判断当前的是否为null environment 是一个字符串 if (environment == null) { environment = context.getStringAttribute("default"); } // 遍历所有子节点 for (XNode child : context.getChildren()) { String id = child.getStringAttribute("id"); // 判断是否存在指定数据库配置 if (isSpecifiedEnvironment(id)) { // 初始化事务管理器 TransactionFactory txFactory = transactionManagerElement(child.evalNode("transactionManager")); // 初始化数据库工厂 DataSourceFactory dsFactory = dataSourceElement(child.evalNode("dataSource")); // 根据数据库工厂获取数据库连接对象 DataSource dataSource = dsFactory.getDataSource(); // 此类是一个静态类 管理数据库连接以及事务 Environment.Builder environmentBuilder = new Environment.Builder(id) .transactionFactory(txFactory) .dataSource(dataSource); configuration.setEnvironment(environmentBuilder.build()); } } } }isSpecifiedEnvironment()方法判断
此方法只是简单的判断当前解析的private boolean isSpecifiedEnvironment(String id) { if (environment == null) { throw new BuilderException("No environment specified."); } else if (id == null) { throw new BuilderException("Environment requires an id attribute."); } else if (environment.equals(id)) { return true; } return false; }<environment>节点配置是不是指定的default属性值。 此处只有通过判断才会解析XML为数据库管理器工厂以及事务管理器工厂。
注意: 此处虽然mybatis 支持配置多个不同环境,但是mybatis在初始化时,并不会过多的解析配置,只会解析当前指定的默认配置- ``
- xml 配置示例以及讲解
解析
<mapper>节点private void mapperElement(XNode parent) throws Exception { if (parent != null) { // 遍历<mappers>下所有子节点 for (XNode child : parent.getChildren()) { // 如果当前节点为<package> if ("package".equals(child.getName())) { String mapperPackage = child.getStringAttribute("name"); configuration.addMappers(mapperPackage); } else { // 如果当前节点为<mapper> // 获取resource、url、class属性 String resource = child.getStringAttribute("resource"); String url = child.getStringAttribute("url"); String mapperClass = child.getStringAttribute("class"); // resource if (resource != null && url == null && mapperClass == null) { ErrorContext.instance().resource(resource); // 将Mapper.xml文件解析成输入流 InputStream inputStream = Resources.getResourceAsStream(resource); // 使用XMLMapperBuilder解析Mapper.xml,并将Mapper Class注册进configuration对象的mapperRegistry容器中 XMLMapperBuilder mapperParser = new XMLMapperBuilder(inputStream, configuration, resource, configuration.getSqlFragments()); mapperParser.parse(); //url } else if (resource == null && url != null && mapperClass == null) { ErrorContext.instance().resource(url); InputStream inputStream = Resources.getUrlAsStream(url); XMLMapperBuilder mapperParser = new XMLMapperBuilder(inputStream, configuration, url, configuration.getSqlFragments()); mapperParser.parse(); // class } else if (resource == null && url == null && mapperClass != null) { Class<?> mapperInterface = Resources.classForName(mapperClass); //注册进configuration对象的mapperRegistry容器中 configuration.addMapper(mapperInterface); } else { throw new BuilderException("A mapper element may only specify a url, resource or class, but not more than one."); } } } } }以上Mapper 节点的解析可以说是重中之重了,
mapper节点的内容是丰富的,其可以通过多种形式来实现,下面先列举不同形式的示例,然后根据示例来对照以上代码分析<!-- 此内容是关于 mapper的定义部分 --> <!ELEMENT mappers (mapper*,package*)> <!ELEMENT mapper EMPTY> <!ATTLIST mapper resource CDATA #IMPLIED url CDATA #IMPLIED class CDATA #IMPLIED > <!-- 方式1 --> <mappers> <mapper resource="test/mapper/UserMapper.xml"/> </mappers> <!-- 方式2 --> <mappers> <package name="test.mapper"/> </mappers> <!-- 指定url --> <mappers> <mapper url="file:///xxx/mappers/UserMapper.xml"/> </mappers> <mappers> <mapper class="test.mapper.UserMapper"/> </mappers>通过针对以上多种不同形式的区分解析,其中主要针对的是XML形式的.通过专门的
XMLMapperBuilder类来解析,在具体的分析此类之前,先回顾下xxxMapper.xml文件中的主要内容<mapper namespace="test.mapper.UserMapper"> <select id="selectUserList" resultType="test.entity.User"> select * from t_user </select> </mapper>此文件主要是Mapper 接口类中方法与对应的SQL语句进行映射关系,简单理解此类中就是多种SQL语句,那么其内部是如何进行解析的并且其实如何做到映射的呢??? 在解决以上问题之前,先解决上文中遗留的一个问题:configuration 是一个全局对象
XMLMapperBuilder类其继承了抽象类BaseBuilder,但是与XMLConfigBuilder不同的是,其并没有在构造函数时初始化一个新的configuration对象,而是通过构造函数将当前对象的configration传入其中的。所以操作的是同一个configuration对象注意: 具体的Mapper 配置文件解析将在下一节中进行详细的分析说明
2. 构建 SqlSessionFactory
通过上文中介绍的内容对XML进行了解析,并生成一个解析结果对象configuration,并将结果传入以下函数中
 // 创建 SqlSessionFactory
  public SqlSessionFactory build(Configuration config) {
    return new DefaultSqlSessionFactory(config);
  }
DefaultSqlSessionFactory是接口SqlSessionFactory的一个实现类.
此类并没有提供复杂的功能,只是是实现了接口中的所有方法以通过不同的方式提供SQLSession对象以供数据库操作
总结
第三节给出了解析流程图
本文讲是 SqlSessionFactory 实现类的初始化过程,但更多的还是在将配置文件XML的介意一个 mapper.xml 文件的解析工作。通过本文可以了解到 mybatis 在初始化的过程中,是一次性将所有的XML文件进行统一的解析后才会进行数据库操作。通过本文可以了解到mybatis在初始化的过程中是如何解析配置文件的,并且其中都进行了那些操作,对mybatis的配置有更深层次的了解
Question And Answer
Question 1
根据上文的提示,mybatis 中的配置Configuration对象其实是抽象类BaseBuilder所拥有的一个全局属性。通过解析配置文件来创建, 此处既然是一个全局属性,全局只有一份的一个类对象,那么为什么不将此类设置为一个单利的呢而是通过构造函数入参的形式来在多各类之间进行传递???
Question 2
根据上文的关于<environment> 节点解析部分,通过源码分析,mybatis 支持配置多种环境,但是在实际解析时,却只解析一种默认环境,为什么会这样操作???
Answer
此处其实也很好理解,(只是我当时没理解所以才存在这个问题).mybatis 支持的是多种配置环境,并不是多个数据源,所以每个项目在启动时只能在一种环境下启动,比如: test,dev 等,并不存在两种环境同时的情况,所以此处灭必要针对其他环境配置进行解析,只需要解析当前指定的环境配置就行
Question 3
根据上文的XML 解析入口部分parse()方法中,通过修改变量属性来确保解析工作再一次项目中只会进行一次,
  public Configuration parse() {
    // 通过此种方式, 保证此方法只调用一次
    if (parsed) {
      throw new BuilderException("Each XMLConfigBuilder can only be used once.");
    }
    // 判断,以保证解析一次, 此处此行代码是否应该放到解析结束更合适?
    parsed = true;
    parseConfiguration(parser.evalNode("/configuration"));
    return configuration;
  }
那么此处为什么不将parsed = true;放在具体的解析之后执行呢?
Answer
此处具体的我个人猜测可能是为了在多线程环境下,用户可能会在不同线程中获取SqlSessionFactory对象进而调用此方法,这样在单个线程并没有进行具体的解析完毕时,另外一个线程调用了此方法。通过此种方式可以避免这种情况,在一个线程进入此方法后,通过此种方式,在解析之前进行锁定,使其他线程进入后直接退出
参考
说明
针对本文中其实很多解析部分都是很简单的,但我为什么还是会写出来的原因说明
虽然很多部分很简单,但是当第一次打开时还是或多或少存在一些疑惑, 还有就是很多人存在的一种去情况就是当打开一个没有注释,很多行代码的文件时,往往就不想进行认真分析和思考了,所以我这里还是会进行了说明。如果这样还是懒得看,那我也🤷♀️了