mybatis 源码分析------Mapper 文件解析
完成状态
- 开发中
- 未完成
- 已完成
- 维护中
前言
上一节中主要介绍了 mybatis 配置文件的解析,其中涉及到<mappers> 节点解析时,并引申出了关于mapper配置文件解析。本节主要围绕上节介绍,更加深入的分析 mapper.xml文件解析
在具体的代码分析之前,首先先看下在xxxmapper.xml文件中,可能存在的配置项
本节将解析mybatis文档进行解析
<?xml version="1.0" encoding="UTF-8"?>
<!DOCTYPE mapper PUBLIC "-//mybatis.org//DTD Mapper 3.0//EN" "http://mybatis.org/dtd/mybatis-3-mapper.dtd">
<mapper namespace="com.catchcatfish.service.serviceloginregister.mapper.TSigninMapper">
<!-- resultMap -->
  <resultMap id="BaseResultMap" type="com.catchcatfish.generator.loginandregister.entity.TSignin">
    <id column="id" jdbcType="INTEGER" property="id" />
    <result column="monday" jdbcType="BIT" property="monday" />
    <result column="tuesday" jdbcType="BIT" property="tuesday" />
    <result column="wednesday" jdbcType="BIT" property="wednesday" />
    <result column="thursday" jdbcType="BIT" property="thursday" />
    <result column="friday" jdbcType="BIT" property="friday" />
    <result column="saturday" jdbcType="BIT" property="saturday" />
    <result column="sunday" jdbcType="BIT" property="sunday" />
    <result column="user_id" jdbcType="VARCHAR" property="userId" />
    <result column="weak_number" jdbcType="INTEGER" property="weakNumber" />
    <result column="create_at" jdbcType="TIMESTAMP" property="createAt" />
    <result column="update_at" jdbcType="TIMESTAMP" property="updateAt" />
  </resultMap>
  <!-- sql -->
  <sql id="Base_Column_List">

    id, monday, tuesday, wednesday, thursday, friday, saturday, sunday, user_id, weak_number,
    create_at, update_at
  </sql>
  <!-- select -->
  <select id="selectByPrimaryKey" parameterType="java.lang.Integer" resultMap="BaseResultMap" >
    select
    <include refid="Base_Column_List" />
    from t_signin
    where id = #{id,jdbcType=INTEGER}
  </select>
  <delete id="deleteByPrimaryKey" parameterType="java.lang.Integer">
    delete from t_signin
    where id = #{id,jdbcType=INTEGER}
  </delete>
  <!-- insert -->
  <insert id="insert" parameterType="com.catchcatfish.generator.loginandregister.entity.TSignin">
    <selectKey keyProperty="id" resultType="int" order="BEFORE">
      SELECT nextval('t_signin_id_seq'::regclass) as id
    </selectKey>
    insert into t_signin (id, monday, tuesday,
      wednesday, thursday, friday, saturday,
      sunday, user_id, weak_number,
      create_at, update_at)
    values (#{id,jdbcType=INTEGER}, #{monday,jdbcType=BIT}, #{tuesday,jdbcType=BIT},
      #{wednesday,jdbcType=BIT}, #{thursday,jdbcType=BIT}, #{friday,jdbcType=BIT}, #{saturday,jdbcType=BIT},
      #{sunday,jdbcType=BIT}, #{userId,jdbcType=VARCHAR}, #{weakNumber,jdbcType=INTEGER},
    NOW(), NOW())
  </insert>
  <!-- update -->
  <update id="updateByPrimaryKeySelective" parameterType="com.catchcatfish.generator.loginandregister.entity.TSignin">
    update t_signin
    <set>
      <if test="monday != null">
        monday = #{monday,jdbcType=BIT},
      </if>
      <if test="tuesday != null">
        tuesday = #{tuesday,jdbcType=BIT},
      </if>
      <if test="wednesday != null">
        wednesday = #{wednesday,jdbcType=BIT},
      </if>
      <if test="thursday != null">
        thursday = #{thursday,jdbcType=BIT},
      </if>
      <if test="friday != null">
        friday = #{friday,jdbcType=BIT},
      </if>
      <if test="saturday != null">
        saturday = #{saturday,jdbcType=BIT},
      </if>
      <if test="sunday != null">
        sunday = #{sunday,jdbcType=BIT},
      </if>
      <if test="userId != null">
        user_id = #{userId,jdbcType=VARCHAR},
      </if>
      <if test="weakNumber != null">
        weak_number = #{weakNumber,jdbcType=INTEGER},
      </if>
      <if test="createAt != null">
        create_at = #{createAt,jdbcType=TIMESTAMP},
      </if>
        update_at = NOW(),
    </set>
    where id = #{id,jdbcType=INTEGER}
  </update>
</mapper>
以上给出了一个最简洁的mapper.xml 配置样式,针对xml 配置文件以及接下来要解析的源码分析的功能进行一个简单的了解,接下来将详细剖析Java代码是如何解析以上配置文件的
Mapper.xml 解析
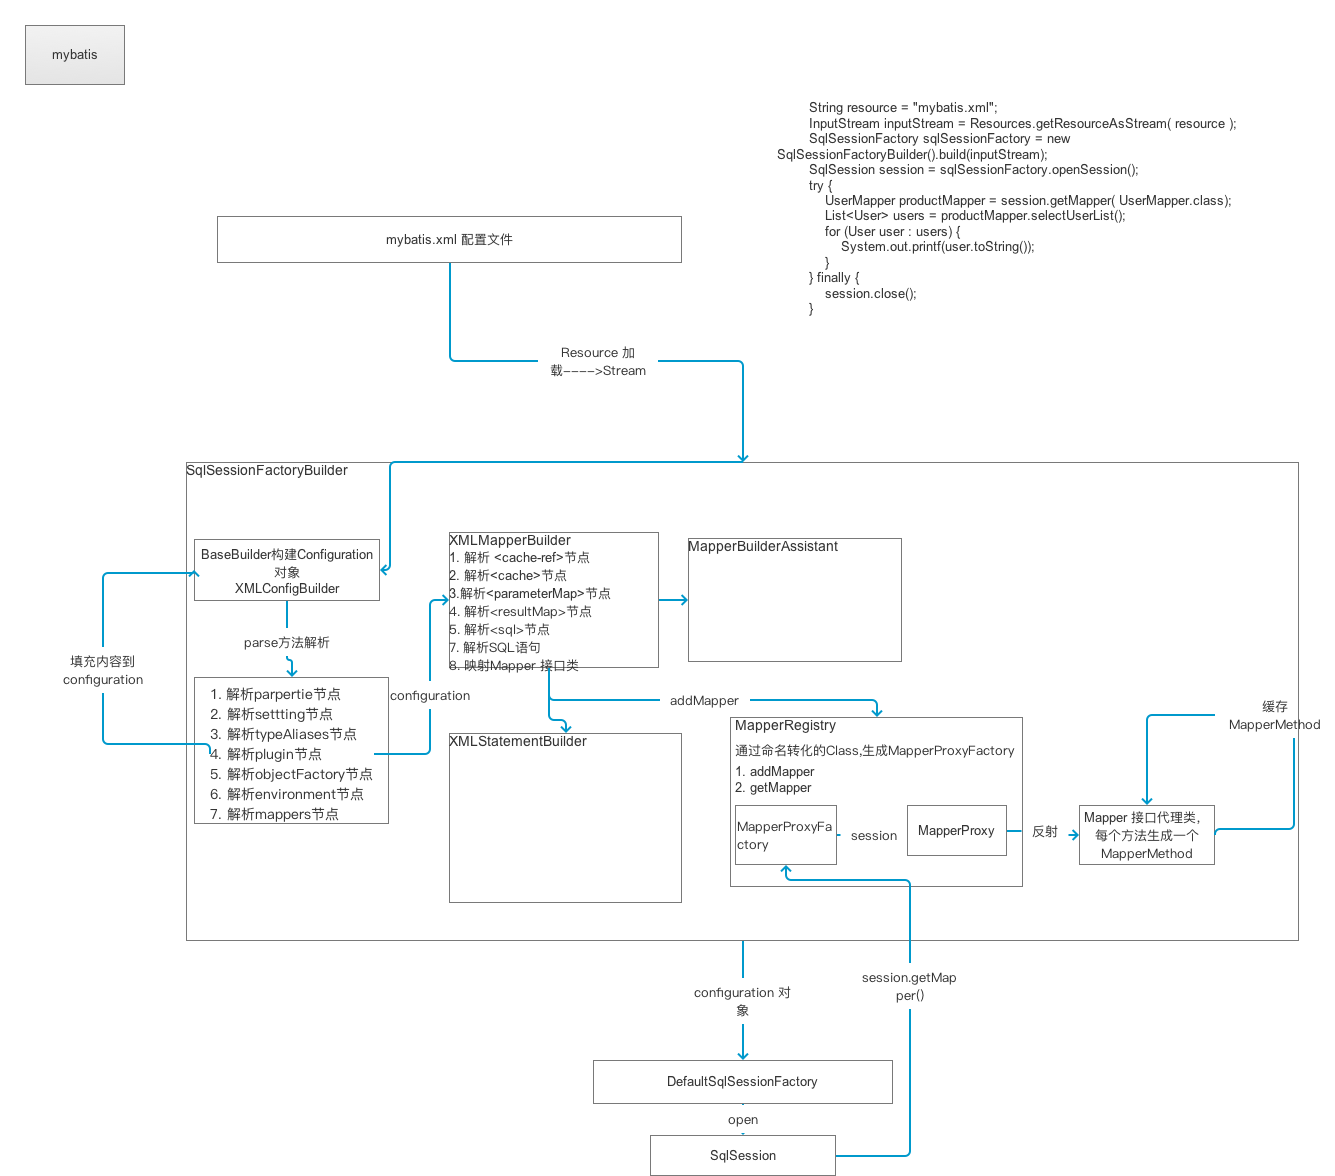
从上节内容了解到 Mapper 文件解析是通过XMLMapperBuilder类来实现的,MapperBuilderAssistant类给予辅助工作
  private XMLMapperBuilder(XPathParser parser, Configuration configuration, String resource, Map<String, XNode> sqlFragments) {
      // 将上个对象中的configuration传入父类中
    super(configuration);
    this.builderAssistant = new MapperBuilderAssistant(configuration, resource);
    this.parser = parser;
    this.sqlFragments = sqlFragments;
    this.resource = resource;
  }
以上是
XMLMapperBuilder构造函数
具体的解析工作和 XMLConfigBuilder相似,并不在构造函数中进行,而在parse方法中进行
  public void parse() {
    // 1. 判断当前 resource 对应的xml 文件是否被加载过(也就是解析过)
    if (!configuration.isResourceLoaded(resource)) {
      // 2. 解析 mapper
      configurationElement(parser.evalNode("/mapper"));
      // 3. 缓存起来
      configuration.addLoadedResource(resource);
      // 4.
      bindMapperForNamespace();
    }
    // 5.
    parsePendingResultMaps();
    parsePendingCacheRefs();
    parsePendingStatements();
  }
以上是mapper 具体解析过程
验证
由于此处的内容是用户输入的,可能存在多次输入相同配置,那么在此处需要经过验证将已经解析过的配置过滤掉。configuration对象中将已经解析过的mapper文件进行了缓存,当再次遇到相同的文件时不进行解析。 此处引申出一个问题: 根据上文内容了解到,mapper 此处的配置分为多种形式,那么此处是如何判断当前这个mapper.xml 已经被加载过????验证以上问题
  <mappers>
          <mapper resource="test/mapper/UserMapper.xml"/>
          <mapper url="file:///Users/niezi/Desktop/Source/mybatis-3-master/src/main/java/test/mapper/UserMapper.xml"/>
      </mappers>
具体的验证
  //loadedResources 是一个Set 结构
  public void addLoadedResource(String resource) {
      loadedResources.add(resource);
  }

  public boolean isResourceLoaded(String resource) {
      return loadedResources.contains(resource);
  }
通过对此处代码分析,其验证的根据是
resource资源的访问路径,根据以上配置,通过resoource和url的形式配置,其虽然两属性可以同时指向一个文件,但是其并不能避免这个文件被解析多次,因为resoource和url的值是不同的,所以Set验证是可以通过的,文件还是被解析。不过其内部还是更深层次的针对文件内容进行验证的。此处的结论:文件还是会被解析,但由于两个路径指向的是同一个文件,内容相同,更深层次的文件内容验证不会通过,所以此处还是会报异常
解析
 private void configurationElement(XNode context) {
     try {
     // 命名空间
     String namespace = context.getStringAttribute("namespace");
     // 验证命名空间
     if (namespace == null || namespace.equals("")) {
         throw new BuilderException("Mapper's namespace cannot be empty");
     }
     // 赋值namespace
     builderAssistant.setCurrentNamespace(namespace);
     // 解析<cache-ref>节点
     cacheRefElement(context.evalNode("cache-ref"));
     // 解析<cache> 节点
     cacheElement(context.evalNode("cache"));
     // 解析 parameterMap 节点
     parameterMapElement(context.evalNodes("/mapper/parameterMap"));
     resultMapElements(context.evalNodes("/mapper/resultMap"));
     // 解析SQL节点
     sqlElement(context.evalNodes("/mapper/sql"));
     // 解析sql语句
     buildStatementFromContext(context.evalNodes("select|insert|update|delete"));
     } catch (Exception e) {
     throw new BuilderException("Error parsing Mapper XML. The XML location is '" + resource + "'. Cause: " + e, e);
     }
 }
以上是具体的解析过程,针对不同的节点进行解析,通过以上内容可以反推出此处支持的配置节点
- 解析
<cache>,<cache-ref>节点
针对当前给定命名空间的缓存配置以及引用 - 解析
<parameterMap>节点
此节点已经废弃,此处不再对其进行说明 - 解析
<resultMap>节点
本节点主要针对数据库以及模型对象的映射,将数据的数据结构与Java的数据结构进行映射匹配 解析
<sql>节点- xml 示例
此处其实就是真正的SQL语句中可能被其他语句重用的语句块<sql id="Base_Column_List"> <!-- WARNING - @mbg.generated This element is automatically generated by MyBatis Generator, do not modify. --> id, monday, tuesday, wednesday, thursday, friday, saturday, sunday, user_id, weak_number, create_at, update_at </sql> Java 源码解析
  private void sqlElement(List<XNode> list) throws Exception {
      if (configuration.getDatabaseId() != null) {
      sqlElement(list, configuration.getDatabaseId());
      }
      sqlElement(list, null);
  }

  private void sqlElement(List<XNode> list, String requiredDatabaseId) throws Exception {
      // 遍历所以节点
      for (XNode context : list) {
      String databaseId = context.getStringAttribute("databaseId");
      String id = context.getStringAttribute("id");
      // 对ID进行处理 比如: test.User.Base_Column_List
      id = builderAssistant.applyCurrentNamespace(id, false);
      if (databaseIdMatchesCurrent(id, databaseId, requiredDatabaseId)) {
          sqlFragments.put(id, context);
      }
      }
  }
以需要注意的地方一个是对ID 的数据, 默认情况下是针对当前SQL节点的ID 与当前SQL的命名空间进行
namespace.id的操作,生成一个新的ID 。并且针对当前sql 节点以 新生成的ID 为key ,sql 节点为value 进行缓存
通过以上方式,解析了XML节点,但是其中还是有很重要的一点,那就是解析SQL语句
- xml 示例
- 解析SQL语句
针对insert, delete,update, selectSQL节点的解析并不是通过当前类XMLMapperBuilder来实现的,而是通过一个单独的XMLStatementBuilder类类实现
接下来将进入private void buildStatementFromContext(List<XNode> list, String requiredDatabaseId) { // 遍历每个节点 for (XNode context : list) { final XMLStatementBuilder statementParser = new XMLStatementBuilder(configuration, builderAssistant, context, requiredDatabaseId); try { // 解析 statementParser.parseStatementNode(); } catch (IncompleteElementException e) { configuration.addIncompleteStatement(statementParser); } } }XMLStatementBuilder中,详细的查看下其实如何解析SQL的XMLStatementBuilder
此类是一个继承自BaseBuilder的类,其同样具有configuraiton属性,所以此处是通过构造函数传入当前的对象类存在的对象(据前文针对此处同样的情况进行了说明以及提出了疑问)。并且此处秉承一贯的做法,并不在构造函数中进行任何的实质代码。此处针对SQL的解析是通过parseStatementNode()函数来实现的
此处由于过于复杂 ,本节将不进行解析,下节将单独进行详细解析, 特此说明
- 解析
缓存
在每次解析之前都会验证此文件是否已经被解析过了,此处解析已经完毕,需要将此文件进行缓存以标记已解析bindMapperForNamespace()
通过以上的方式完成了XML的解析工作。private void bindMapperForNamespace() { // 获取当前映射文件对应的DAO接口全限定名称(parse方法填入的命名空间) String namespace = builderAssistant.getCurrentNamespace(); if (namespace != null) { Class<?> boundType = null; try { // 解析成Class对象 boundType = Resources.classForName(namespace); } catch (ClassNotFoundException e) { //ignore, bound type is not required } if (boundType != null) { if (!configuration.hasMapper(boundType)) { // Spring may not know the real resource name so we set a flag // to prevent loading again this resource from the mapper interface // look at MapperAnnotationBuilder#loadXmlResource // 标记当前加载资源 configuration.addLoadedResource("namespace:" + namespace); // 将DAO接口的Class对象注册进configuration中 configuration.addMapper(boundType); } } } }此方法的作用就是注册Mpper 对应接口类,其中需要注意的地方是
configuration.addLoadedResource("namespace:" + namespace);此处为什么会再次进行标记呢?
由于mapper 可以通过多种形式进行解析,一个mapper 文件对应一个Mapper interface接口类,之前parse中标记的是以XML路径的形式进行标记的,此种方式可以避免一个mapper 配置文件被多次加载,通过此处再次标记,可以避免mapper 通过 interface的形式再次被注册。双重过滤configuration 中 mapper 注册存储
以上代码中通过configuration.addMapper(boundType);方法将mapper 接口类进行注册。其内部是通过一个MapperRegistry类实现存储的,并且在存储的过程中,通过给定义的接口类名为其生成一个代理对象工厂MapperProxyFactorypublic <T> void addMapper(Class<T> type) { // 验证当前传进来的是 不是接口类型 Mapper 都是接口类 if (type.isInterface()) { // 判断是否已经存在 if (hasMapper(type)) { throw new BindingException("Type " + type + " is already known to the MapperRegistry."); } // boolean loadCompleted = false; try { //创建一个代理对象 knownMappers.put(type, new MapperProxyFactory<T>(type)); // It's important that the type is added before the parser is run // otherwise the binding may automatically be attempted by the // mapper parser. If the type is already known, it won't try. // 解析注解 如果注解解析失败 那么就删除 type MapperAnnotationBuilder parser = new MapperAnnotationBuilder(config, type); parser.parse(); loadCompleted = true; } finally { if (!loadCompleted) { knownMappers.remove(type); } } } }注意: 存储的形式是hashMap 结构的,
type = new MapperProxyFactory<T>(type)
那么此处为什么要生成一个代理工厂类对象并对其进行存储??
此处内容会涉及到下一节SqlSession的操作部分,此处暂且略过,下一节进行详细说明(和Mapper的获取有关)MapperProxyFactory类public class MapperProxyFactory<T> { // 创建时传入的Class 对象 private final Class<T> mapperInterface; // 缓存当前 private final Map<Method, MapperMethod> methodCache = new ConcurrentHashMap<Method, MapperMethod>(); public MapperProxyFactory(Class<T> mapperInterface) { this.mapperInterface = mapperInterface; } public Class<T> getMapperInterface() { return mapperInterface; } public Map<Method, MapperMethod> getMethodCache() { return methodCache; } // 生成代理对象, @SuppressWarnings("unchecked") protected T newInstance(MapperProxy<T> mapperProxy) { return (T) Proxy.newProxyInstance(mapperInterface.getClassLoader(), new Class[] { mapperInterface }, mapperProxy); } public T newInstance(SqlSession sqlSession) { final MapperProxy<T> mapperProxy = new MapperProxy<T>(sqlSession, mapperInterface, methodCache); return newInstance(mapperProxy); } }从内容上来看,此类并不复杂,但其在下一节中的Session 操作起着至关重要的功能,此处只是简单介绍其功能,下一届中再详细介绍其作用和操作过程
总结

以上给出的是部分解析流程图
自此,整个mybatis的初始化工作已经完毕。 通过以上两篇内容,详细说名了XML文件的解析过程,其映射到示例代码中是
        String resource = "mybatis.xml";
        InputStream inputStream = Resources.getResourceAsStream( resource );
        SqlSessionFactory sqlSessionFactory = new SqlSessionFactoryBuilder().build(inputStream);
整个项目的初始化工作即将完成,接下来将详细介绍SqlSession 的工作原理及源码分析